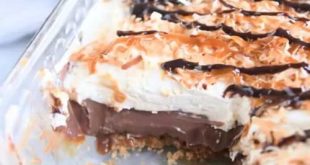
Brownie mix + marshmallows + toasted pecans + fudge sauce has never been tastier (or easier!). These Mississippi Mud Bars are incredibly delicious and so easy to make!
These bars! Seriously, they are amazing. Get ready to wow your friends and family with this delicious little Mississippi Mud Bar.
I recently made these for a church event and was kind of surprised at how many people were excited about them.
Perhaps it should be revealed that the event was a Boy Scout Pinewood Derby. I know that a bunch of energetic, slightly smelly kids (I can say that because two of them are my kids) who willingly eat crumbled Oreo cookies from the gym may not be the most objective judges of dessert.
But I still stand by their honest comments (even if I have to hold the pan over my head and threaten to rip the wheels off their cars at the Pinewood Derby if they come back for a fifth loaf without washing their hands or asking their mom first).
And judging by the fact that so many parents have asked for the recipe, I can safely and comfortably recommend these bars for all your future events, lunches, or late-night needs.
At first, I was skeptical that these bars could fulfill my chocolate lover dreams because the brownie/sponge cake base is so… well… thin.
And I don’t know about you, but in my opinion, the word “thin” doesn’t fit anywhere near a pan of delicious, chocolatey brownies.
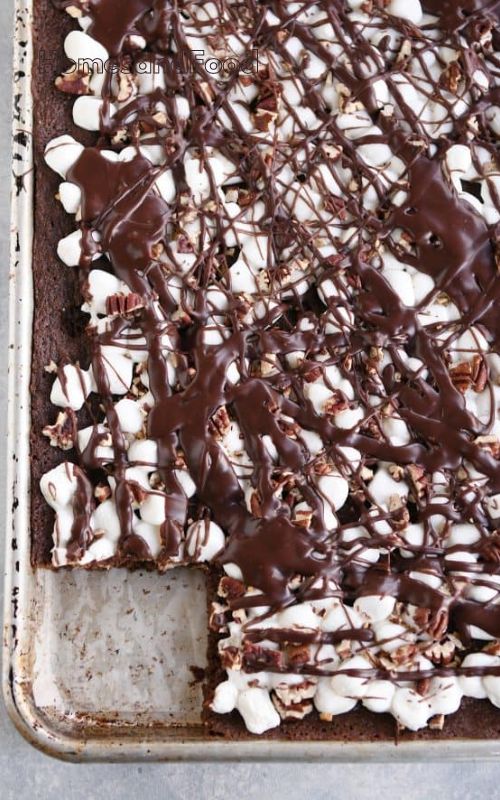
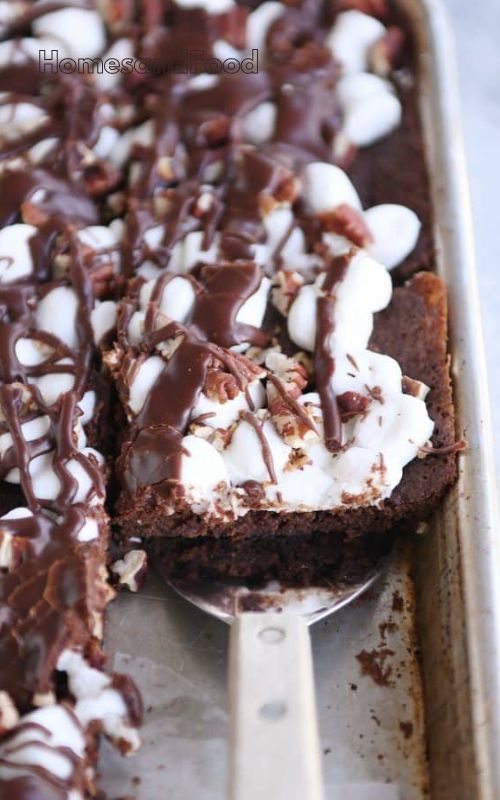
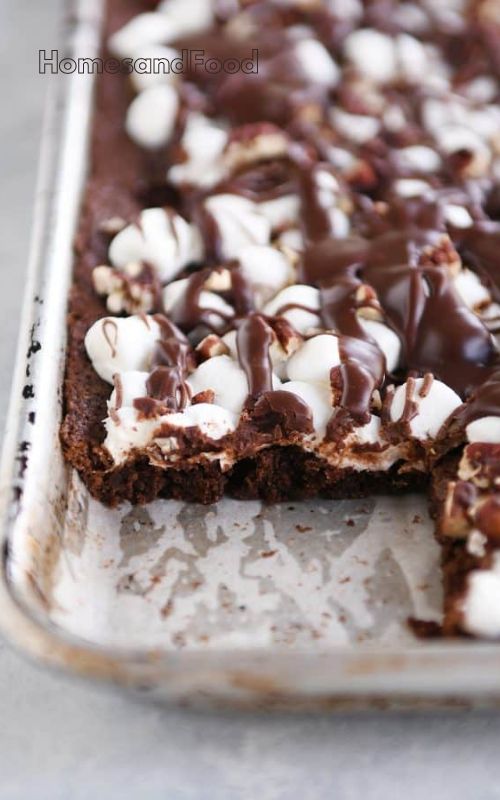
However, the end result of topping soft, rich brownies with marshmallows, pecans, and a bit of chocolate far exceeded my expectations.
The ratio of equal parts brownie and marshmallow is what makes these Mississippi Mud bars so divine. Basically, thin brownies are welcome here.
The brownie cake layer (it’s actually a mix between a brownie and a cake in terms of texture and flavor) is mixed together in one bowl, making assembling these bars ultra-easy.
Then, once baked, the marshmallows are poured on top and softened for a few more minutes in the oven before receiving a dose of toasted nuts.
And speaking of nuts, I know there are organizations dedicated to hating nuts in desserts… and an equal number of people fighting the other side.
I’m somewhere in the middle. 99% of the time, I choose NOT to put nuts in any of my brownies or cakes (total exception for these white chocolate pecan brownies and a few other divine special cases).
But without the nuts, these Mississippi Mud bars are not complete, and I personally loved the toasted crunch. Since I’m a nut hater, that should give you a little push to add them if you’re on the fence.
Roasting the nuts is optional, but the flavor level is so important, I definitely recommend doing that (or buying roasted nuts…I know Trader Joe’s sells them).
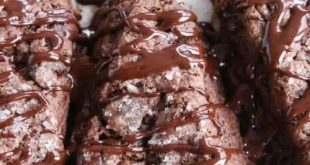
Also, make sure that when you get to the chocolate drizzle step, you’re very careful to apply the chocolate drizzle to the top of the bars in a very precise, geometric pattern.
You might want to consider drawing out the drizzle process on graph paper first, since perfection is the only acceptable method here.
Ha ha .
That’s a joke.
Drizzle until it appears untidy and incredibly tasty. Go crazy.
As you can see from the pictures, these Mississippi clay slabs are made in the shape of a baking sheet.
Great and very handy for parties or events where you are serving food to a large number of people.
I know a good, trustworthy food blogger would have tried to scale down the recipe and make it in a 9×13 inch pan or smaller.
But this food blog is not me today.
I love baking sheet recipes like this because I often need a large, convenient dessert to bring to church events, family gatherings, or anything else I can think of (yes, even a family party night can sometimes justify spending big bucks on a baking sheet).
However, as stated in the recipe, I think it is possible to split the recipe in half and bake it in a 9X13 inch pan. Can anyone tell us if they try this? Thanks. 🙂
Mississippi Clay Bars
Yield: 24 Bars
Prep Time: 1 Hour
Cook Time: 25 Minutes
Total Time: 1 Hour 30 Minutes
Ingredients
Bars:
- 1 ⅓ cups (189 grams) all-purpose flour
- 1 cup (212 grams) granulated sugar
- 1 cup (212 grams) brown sugar
- ½ cup (43 grams) unsweetened cocoa powder
- ½ teaspoon baking soda
- ½ teaspoon salt
- 1 cup (227 grams) melted salted butter
- 4 large eggs
- 1 teaspoon vanilla extract
- 10-ounce (283-gram) package mini marshmallows
- 1 cup (120 grams) chopped toasted pecans (optional but delicious)
Chocolate topping:
- ⅓ cup (28 grams) unsweetened cocoa powder
- ¼ cup milk
- ¼ cup (57 grams) salted butter
- pinch of salt
- 2 cups (228 grams) powdered sugar
- 1 teaspoon vanilla extract
Instructions
- Preheat oven to 350 degrees F. Line a large rimmed baking sheet (half sheet pan, about 12 x 18 inches) with parchment paper and lightly grease with cooking spray. Alternatively, you can line it with aluminum foil and grease it with aluminum foil or leave the sheet unlined and grease it with parchment paper.
- For the cookies, in a large bowl, whisk together the flour, sugar, brown sugar, cocoa (sift the cocoa into the bowl using a fine mesh strainer if it’s too lumpy), baking soda, and salt. Add the melted butter, eggs, and vanilla. Mix until combined (do not overmix; just mix/stir until there are no dry streaks and the ingredients are evenly mixed).
- Spread the mixture evenly in a thin layer in the prepared pan. Bake for 15-20 minutes until the tops are springy to the touch and a toothpick inserted in the center comes out clean. Watch closely to avoid overbaking the cookies!
- Remove the cake from the oven, sprinkle evenly with the marshmallows, and bake for another 3-5 minutes until the marshmallows are set.
- Sprinkle with the walnuts and let cool to room temperature before glazing.
- To make the chocolate filling, in a medium saucepan, whisk together the cocoa powder (I sift it to avoid lumps), milk, butter, and salt. Bring to a boil over medium heat, stirring or whisking constantly.
- Remove the cake from the heat and stir in the powdered sugar and vanilla. Thin with additional milk, if necessary, until the mixture is thick but can be easily poured over the cake.
- Drizzle the glaze in a crisscross pattern over the cake. Serve warm or at room temperature. It is easiest to cut if it is completely cool.
Notes
Glazing: I prefer to glaze the bars with chocolate sauce after they have cooled so the chocolate mixture doesn’t soak into/sink into the marshmallows, but if you’re not keen on that, you can save time and glaze them while they ‘re warm.
Half the Recipe: I haven’t tried halving the recipe, but you might want to try a 9×13-inch loaf (or a little smaller).
Cutting the Bars: Having marshmallows in them can be messy and tricky. I’ve had good luck letting these bars cool completely (to room temperature) and using a sharp knife to cut the bars using short strokes rather than dragging the knife across the bars. I also keep kitchen shears/scissors handy to trim away any stray marshmallows that want to stick when I scoop the bars out.